Wednesday, April 21, 2010

The Terra Preta Project, Step 1 and 2


How to convert a dry/waterlogged, poor soil landscape into a lush rich garden!

Here we are starting a whole new project on converting poor soil, with hard tufts of grasses into useable agricultural soil. The soil is highly weathered clay, with non existing top soil, which becomes waterlooged and sticky during torrential rains, and dry packed hard soil during the dry season. The area is extremely dry with intermittent rainfall in the rainy season. This picture was taken at the end of the dry season.

The name Terra Preta is derived from the soil fenomenon found in the Amazon basin. These earths appear to be anthropogenic and have been studied in recent years, to find out why this soil, apparently created by ancient indian is so fertile and black even centuries later. We will be using some of those techniques in this system later on.

STEP 1.
Create an interconnected swale/water hole system.

Swales are constructed perpendicular to hills. These swales collect rainwater and carry it along at a 2% grade across the land. At each junction a water hole is constructed, from which another swale carries the overload across the land in the opposite directtion. Water holes can also be constructed in between junctions to allow collection of excess rain water.

Then end result is a zig-zag system of water channels which not only prevent erosion, but deposit the water in numerous water holes along the way before draining away into a nearby stream. The water is therfore maintained in these holes which allow moisture to seep into the surrounding soil between rainfall, or can be used for irrigation when necessary. This swale system will also be used for drainage later on.

STEP 2.
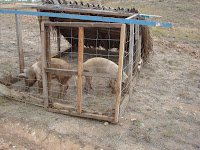
Put piggies to work! Pigs in piggy tractors, are put in place to excavate the soil little by little. If it is desired to do the work faste, one can use more pigs, in more tractors. The pigs are showered daily and the soil moistened, upon which they begin their work. The grasses are uprooted, and the end result is loose brown soil complete with pig manure!
Tuesday, April 20, 2010

Companion planting corn and beans


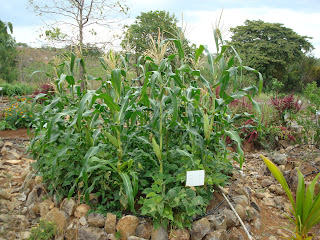
Here is a good example of companion planting.
corn thrives being planted with beans, in this case green beans. You actually put the corn and the beans seed in the same hole, and voilá!

The corn provides a trellis to the bean, and the bean fixes nitrogen for the corn as well as maintains humidity. One of our first crops while improving the soil after planting only beans, was corn with beans.

Wednesday, April 14, 2010

Our New Bunny House

Well, weve just constructed our first large scale bunny house. None of those independent cages that your used to seeing. I first saw the design in another blog that showed a picture of bunnies, in a bunny house in Morocco.


The bunnies used to be in bunny tractors, but that quickly became a problem because, first the females like to burrow in the ground for their nests, and if the tractor keeps moving they cannot establish their den. The other reason is also that burrowing in the ground of a movable cage is not ideal, as the bunnies carve holes large enough to escape or be endangered by dogs or other animals.
The other problem I noticed is that the rabbits become very wild in that environment and not very socialized, nor do they receive enough space for running around.

This new house has cubicles all around the house while the interior stays open to socialization. We made a 10' x 12' wooden frame, wraped in chicken wire from the inside. We burried the wire about 2 feet deep cemented into the ground. An 18 inch tall frame of sticks was built around the emerging wire. Onto this frame and wire support we proceeded to add "barro" or earth/clay with grass to make an 18 inch tall wall all around. We didn´t use cement because That would have heated up too much with the sun and would have caused the cubicles to be really hot. At the same time we were making blocks of earth stabilized with grass. The dimensions of these are 18"x18"x4". The cubicles were covered with 10' long boards.
The roof is a really nice clay imitation roof that we painted brick red.

Once the blocks were all dry we placed them in their locations to make 15 cubicles. We then smoothed and filled in the walls and cubicles with a water clay earth mixture. We then proceeded to fill the entire house with enough dirt to raise the floor about 3" to 4". The cubicles were then secure not to tople over. A bedding can be added on top like rice husks which we made an order for but still have not received. In the social area of the middle is where the water, fresh food and pellets and hay are put.

The house can be raked easily to clean, and the cubicles have access through the roof or by removing the clay blocks.

Once we added the bunnies, they were extatic! The moms with their young babies quickly picked their den. The babies started to explore all the cubicles with eagerness, hopping and skipping and running around with glee. Once we added the young immature females, they started jumping all over, including on top of the boards, looking at their million dollar view. All in all success!

The breeding males are kept separate, and the young males are separated once they start producing their scrotum and just when their testes descend, to the bunny tractor until they are large enough to slaughter, along with the older or unreliable females. We place the mature females one by one into the breeding males cage, for one day, and one night, then add them to the house.

We haven't had any moms give birth there yet, so I will coment on that when it happens. But as far as I now, they will burrow into their den, and slowly the babies will emerge as they grow.